Face Landmarks detection is a technique developed back in 2014, and it involves finding the different parts of the face, such as the left eye, the jaw, the nose, and more. The developer has made a library called Dlib, which is responsible for finding these face landmarks with the help of the OpenCV library.
1. Face Landmarks
The dlib library treats every human face as a separated section like right eye, left eye, jaw, nose points, and many other face parts. These points range from 0 to 67 as you see them in the picture:
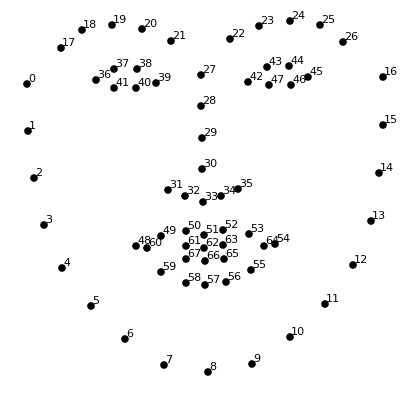
You can see from the picture that the nose points, for example, start from 27 to 35 or the left eye from 36 to 41.
If you are using Jupyter Notebook, then use these commands instead in its cells because it has a different way of installing them:
!pip3 install opencv-python
!pip3 install dlib
If you are using another IDE like Anaconda or PyCharm, you can search for their way of installing these libraries. I’ve only mentioned the traditional way of installing them and how you can do it in Jupyter Notebook since this is what I’m going to use.
2. Reading The Image
You will need first to import an image in the program using the OpenCV library. Let’s see a simple example of doing this:
import cv2

# Reading The Image
img = cv2.imread("Face.jpg")

# Show The Image
cv2.imshow("Face", img)

# Milliseconds Time To Show The Image
cv2.waitKey(0)

# Close All Windows
cv2.destroyAllWindows()
The program is straightforward to understand. First, we import the OpenCV library. Then we read the image using the .imread() function followed by the image name. Later, we use the .imshow() to show the image, and you specify the windows name and the image you need to show.
Finally, use the .waitKey(0) function to keep showing the image for an infinite time and the .destroyAllWindows() function to close the windows after pressing any key on your keyboard.
3. Convert The Image To GrayScale
This colored image has three channels: Blue, Green, Red and it will be hard for the program to deal with three channels and time-consuming for the algorithm to go through all of them.
So the solution for this problem is to convert the image into grayscale, and it will have only one channel, which makes it much easier to process. Let’s see how you can perform this:
import cv2

# Reading The Image
img = cv2.imread("Face.jpg")

# Convert The Image To GrayScale
gray = cv2.cvtColor(img, cv2.COLOR_BGR2GRAY)

# Show The Image
cv2.imshow("Face", gray)

# Milliseconds Time To Show The Image
cv2.waitKey(0)

# Close All Windows
cv2.destroyAllWindows()
The function .cvtColor() will convert the image color. You need to pass the image first and follow it with the cv2.COLOR_BGR2GRAY algorithm that will convert it to grayscale.
4. Detect The Face Inside The Image
Importing the converting the image is so easy, and now after done processing the image using OpenCV, we will move into using the Dlib library to find the human face inside the image. Let’s see how you can perform this:
import cv2
import dlib

# Loading The Face Detector
detector = dlib.get_frontal_face_detector()

# Reading The Image
img = cv2.imread("Face.jpg")

# Convert The Image To GrayScale
gray = cv2.cvtColor(img, cv2.COLOR_BGR2GRAY)

# Using The Detector To Find The Landmarks
faces = detector(gray)
for face in faces:
    x1 = face.left() # Left Point
    y1 = face.top() # Top Point
    x2 = face.right() # Right Point
    y2 = face.bottom() # Bottom Point
    # Drawing a Rectangle
    cv2.rectangle(img, pt1=(x1, y1), pt2=(x2, y2), color=(255, 0, 0), thickness=5)

# Show The Image
cv2.imshow("Face", img)

# Milliseconds Time To Show The Image
cv2.waitKey(0)

# Close All Windows
cv2.destroyAllWindows()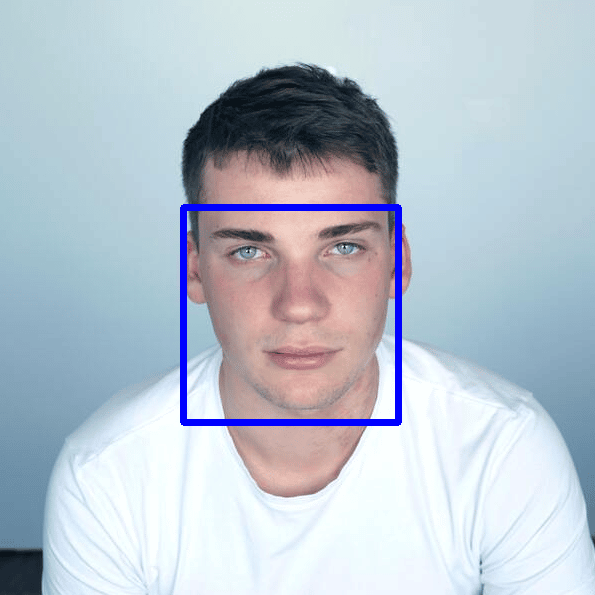
You can see that there is a blue rectangle on this face. The first three lines are for importing the necessary libraries: open-cv and dlib. Then we load the face detector .get_frontal_face_detector() and make it an object.
We read the image and converted it to grayscale in the following two lines. We pass the gray image to the detector to recognize the face place inside the image. Then we loop over the face to get the top of the point, left, right, bottom, and we use them to draw a rectangle.
The .rectangle() function will get the image, followed by the top-left point and the bottom right point for making the rectangle. You will also pass the BGR color, which is (255, 0, 0), and the thickness of the line.
5. Finding The Face Points
Dlib has a unique function called shape_predictor(), and it will have a trained file to get the facial landmarks. Let me show you the code, and I will explain how it works:
import cv2
import dlib

# Loading The Face Detector
detector = dlib.get_frontal_face_detector()

# Loading The Predictor
predictor = dlib.shape_predictor("shape_predictor_68_face_landmarks.dat")

# Reading The Image
img = cv2.imread("Face.jpg")

# Convert The Image To GrayScale
gray = cv2.cvtColor(img, cv2.COLOR_BGR2GRAY)

# Using The Detector To Find The Landmarks
faces = detector(gray)
for face in faces:
    x1 = face.left() # Left Point
    y1 = face.top() # Top Point
    x2 = face.right() # Right Point
    y2 = face.bottom() # Bottom Point

    # Create a Landmark Object
    Landmarks = predictor(image=gray, box=face)
    x = Landmarks.part(8).x
    y = Landmarks.part(8).y
    # Drawing a Circle
    cv2.circle(img=img, center=(x, y), radius=5, color=(255, 0, 0), thickness=-1)

# Show The Image
cv2.imshow("Face", img)

# Milliseconds Time To Show The Image
cv2.waitKey(0)

# Close All Windows
cv2.destroyAllWindows()
I will explain only the newly added lines of code, so we want to keep repeating the explanation. We’ve used the .shape_predictor() followed by the .dat file, trained to get the facial landmarks. Later, we use this predictor and specify the gray image and the box, which is the face points coordinates:
Landmarks = predictor(image=gray, box=face)We can then use this landmark object you see above to find any point of the face by these following codes:
x = Landmarks.part(8).x
y = Landmarks.part(8).y
So we will later use the .circle() function to make a small point of the face by adding the image first. Then the center of the point is the x & y point that the landmark object found before. We also specify the circle radius, the color, and -1 for the thickness, which means that this circle will be full of color.
6- Find The Whole Face Landmarks
Let’s now use the for loop to loop over the whole points from 0 to 67 and draw them using the .circle() function:
import cv2
import dlib

# Loading The Face Detector
detector = dlib.get_frontal_face_detector()

# Loading The Predictor
predictor = dlib.shape_predictor("shape_predictor_68_face_landmarks.dat")

# Reading The Image
img = cv2.imread("Face.jpg")

# Convert The Image To GrayScale
gray = cv2.cvtColor(img, cv2.COLOR_BGR2GRAY)

# Using The Detector To Find The Landmarks
faces = detector(gray)
for face in faces:
    x1 = face.left() # Left Point
    y1 = face.top() # Top Point
    x2 = face.right() # Right Point
    y2 = face.bottom() # Bottom Point

    # Create a Landmark Object
    Landmarks = predictor(image=gray, box=face)
    # Loop through all the points
    for z in range(0, 68):
        x = Landmarks.part(z).x
        y = Landmarks.part(z).y
        # Drawing a Circle
        cv2.circle(img=img, center=(x, y), radius=5, color=(255, 0, 0), thickness=-1)

# Show The Image
cv2.imshow("Face", img)

# Milliseconds Time To Show The Image
cv2.waitKey(0)

# Close All Windows
cv2.destroyAllWindows()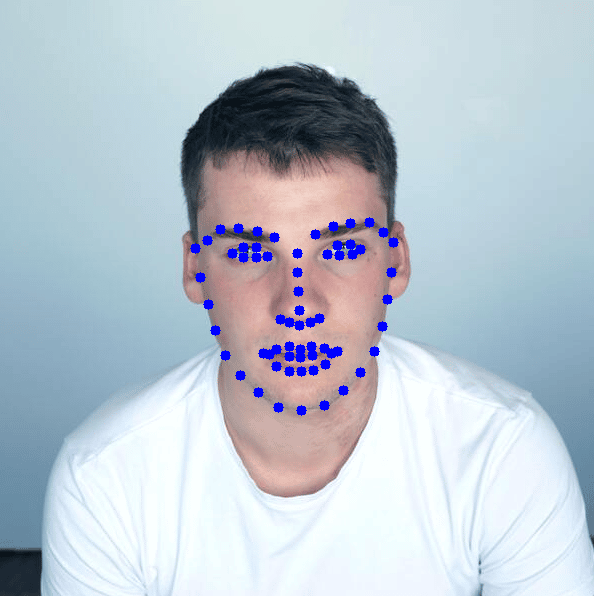
If you want to draw only the points of a specific part of the face, you can change the numbers inside the range function. For instance, the left eye start from point 36 to 41, and the range function should be:
for z in range(36, 42):You can notice that I’ve added one to the 41 number because the range function will ignore the last number, which is 42.
Conclusion
Thanks for reading! Face landmark detection sometimes will be helpful in face recognition systems and when you want to extract the face for face swapping, controlling something with your eyes, and more. The list is endless of what you can do with this program.